
设计模式学习
23种设计模式
创建型模式
1. 简单工厂模式(Simple Factory Pattern)
简单工厂模式的核心是定义一个创建对象的接口,将对象的创建和本身的业务逻辑分离,降低系统的耦合度,使得两个修改起来相对容易些,当以后实现改变时,只需要修改工厂类即可。在简单工厂模式中,我们在创建对象时不会向客户端暴露创建逻辑,而是使用一个共同的接口来创建对象。
public class demo2 {

    public class User {
        public void getGoods() {
            Factory factory = new Factory();
            Mose mose = (Mose) factory.createEntity(EntityEnum.MOSE);
            KeyBoard keyboard = (KeyBoard) factory.createEntity(EntityEnum.KEYBOARD);
        }
    }

    public enum EntityEnum {
        MOSE,KEYBOARD
    }

    public class Factory {
        public Object createEntity (EntityEnum entityEnum) {
            if (EntityEnum.MOSE == entityEnum) {
                return new Mose();
            } else if (EntityEnum.KEYBOARD == entityEnum) {
                return new KeyBoard();
            }
            return null;
        }
    }

    public class Mose {
        public Mose() {
            System.out.println("生产出一个鼠标");
        }
    }

    public class KeyBoard {
        public KeyBoard() {
            System.out.println("生产出一个键盘");
        }
    }

}
优点
简单工厂模式使用工厂类来统一创建对象,实现了使用和创建的分离。只需知道具体产品类所对应的参数即可,通过引入配置文件,可以在不修改任何客户端代码的情况下更换和增加新的具体产品类,在一定程度上提高了系统的灵活性。
缺点
但缺点在于不符合“开闭原则”,每次添加新产品就需要修改工厂类。在产品类型较多时,有可能造成工厂逻辑过于复杂,不利于系统的扩展维护,并且工厂类集中了所有产品创建逻辑,一旦不能正常工作,整个系统都要受到影响。
2. 工厂方法模式(Factory Method Pattern)
工厂方法模式是将工厂类的创建过程抽象出来,每个具体的产品类都有一个对应的工厂类来创建对象。客户端代码只需要调用相应的工厂类来创建对象即可。
public class demo3 {

    abstract class Product {
    }

    public class Mose extends Product {
        public Mose() {
            System.out.println("生产出一个鼠标");
        }
    }

    public class KeyBoard extends Product {
        public KeyBoard() {
            System.out.println("生产出一个键盘");
        }
    }

    interface FactoryProduct {
        Product creatProduct();
    }

    public class MoseFactory implements FactoryProduct {

        @Override
        public Mose creatProduct() {
            return new Mose();
        }
    }

    public class KeyBoardFactory implements FactoryProduct {

        @Override
        public KeyBoard creatProduct() {
            return new KeyBoard();
        }
    }

    void mian () {
        MoseFactory moseFactory = new MoseFactory();
        Mose mose = moseFactory.creatProduct();
        KeyBoardFactory keyBoardFactory = new KeyBoardFactory();
        KeyBoard keyBoard = keyBoardFactory.creatProduct();
    }

    public static void main(String[] args) {
        demo3 demo3 = new demo3();
        demo3.mian();
    }
}
优点:
工厂方法模式将工厂抽象化,并定义了一个创建对象的接口。每次增加新的产品只需要增加该产品跟该产品的工厂类由具体工厂类决定要实例化的产品是哪个,将对象的创建与实例化延迟到子类,这样工厂的设计就符合“开闭原则”了,扩展时不必去修改原来的代码。
缺点:
但缺点在于,每增加一个产品都需要增加一个具体产品类和实现工厂类,使得系统中类的个数成倍增加,在一定程度上增加了系统的复杂度,同时也增加了系统具体类的依赖。
缺点:
3. 抽象工厂模式(Abstract Factory Pattern)
抽象工厂模式是在工厂方法模式的基础上,将工厂类的抽象化程度再提高一层。抽象工厂模式用于创建一组相关的对象,它提供了一个接口,用于创建一系列的产品。客户端代码不需要关心具体的产品类,只需要知道抽象工厂和抽象产品类即可。
public class demo4 {

    /**
     * 产品抽象类
     */
    abstract class Product {
    }

    /**
     * 鼠标抽象实现类
     */
    public class Mose extends Product {
        public Mose() {
            System.out.println("生产出一个鼠标");
        }
    }

    /**
     * 键盘抽象实现类
     */
    public class KeyBoard extends Product {
        public KeyBoard() {
            System.out.println("生产出一个键盘");
        }
    }

    /**
     * 维修抽象类
     */
    abstract class Maintain {
    }

    public class MaintainMose extends Maintain {
        public MaintainMose() {
            System.out.println("维修一个鼠标");
        }
    }

    public class MaintainKeyBoard extends Maintain {
        public MaintainKeyBoard() {
            System.out.println("维修一个键盘");
        }
    }

    /**
     * 抽象工厂类
     */
    abstract class AbstractFactory {
        public abstract Product createProduct();

        public abstract Maintain createMaintain();
    }


    public class MoseFactory extends AbstractFactory {
        @Override
        public Mose createProduct() {
            return new Mose();
        }

        @Override
        public MaintainMose createMaintain() {
            return new MaintainMose();
        }
    }

    public class KeyBoardFactory extends AbstractFactory {
        @Override
        public KeyBoard createProduct() {
            return new KeyBoard();
        }

        @Override
        public MaintainKeyBoard createMaintain() {
            return new MaintainKeyBoard();
        }
    }

    void mian() {
        MoseFactory moseFactory = new MoseFactory();
        moseFactory.createProduct();
        moseFactory.createMaintain();
        KeyBoardFactory keyBoardFactory = new KeyBoardFactory();
        keyBoardFactory.createProduct();
        keyBoardFactory.createMaintain();
    }

    public static void main(String[] args) {
        demo4 demo3 = new demo4();
        demo3.mian();
    }
}
缺点:
但该模式的缺点在于添加新的行为时比较麻烦,如果需要添加一个新产品族对象时,需要更改接口及其下所有子类,这必然会带来很大的麻烦。
4. 单例模式(Singleton Pattern)
单例模式是最简单的设计模式之一。在单例模式中,一个类只能创建一个实例,以确保它所有的实例都访问相同的状态。
简单懒汉模式
在第一次创建对象的时候去创建对象,使用static保证只会实例化一次
public class Demo5 {

    private static Demo5 demo5 = null;

    public Demo5() {
    }

    private static Demo5 getDemo() {
        if (null == demo5) {
            demo5 = new Demo5();
        }
        return demo5;
    }

    public static void main(String[] args) {
        Demo5 demo = Demo5.getDemo();
    }
}
缺点:
懒汉式单例的实现是线程不安全的,在并发环境下可能出现多个 Singleton 实例的问题。要实现线程安全,有以下三种方式
方式一
在方法调用上加了同步,虽然线程安全了,但是每次都要同步,会影响性能,毕竟99%的情况下是不需要同步的。
private synchronized static Demo5 getDemo() {
    if (null == demo5) {
        demo5 = new Demo5();
    }
    return demo5;
}
方式二
双重检查锁定
public class Demo6 {

    private volatile static Demo6 demo5 = null;

    public Demo6() {
    }

    private  static Demo6 getDemo() {
        if (null == demo5) {
            synchronized (Demo6.class){
                //判断两次空是避免两个线程都通过了第一个"null == demo5"校验,从而创建多次对象
                if (null == demo5) {
                    demo5 = new Demo6();
                }
            }
        }
        return demo5;
    }
}
方式三:静态内部类
public class Demo7 {

    //静态内部类只会加载一次
    public static class Demo7a {
        private static final Demo7 dmo = null;
    }

    private static Demo7 getDemo() {
        return Demo7a.dmo;
    }
}
简单饿汉模式
饿汉式在类创建的同时就已经创建好一个静态的对象供系统使用,以后不再改变,所以天生是线程安全的。
public class Demo8 {

    private  static Demo8 demo5 = new Demo8();

    private Demo8() {
    }

    private  static Demo8 getDemo() {
        return demo5;
    }
}
缺点
因为声明的对象是提前创建好,且申明是静态的,会在类初始化时候创建,在类卸载时候才释放,生命周期过长
5. 原型模式(Prototype Pattern)
原型模式是指创建重复的对象,同时又能保证性能。它通常需要先创建一个原型对象,然后通过复制该对象来创建新的对象。
引用拷贝
其实就是赋值
Date date = new Date();
Date date2 = date;
浅拷贝的实现方式
浅拷贝仅复制对象的第一层数据,对于多层嵌套结构的对象,浅拷贝后的新对象会和原对象共享引用。这意味着如果嵌套层级中的子对象发生了改变,浅拷贝的对象和原对象都将受影响。
@Data
@AllArgsConstructor
public class JeepCar implements Cloneable {

    private String mode;

    private LocalDateTime createDate;

    private double price;

    private Engine engine;

    @Override
    public JeepCar clone() {
        try {
            // TODO: copy mutable state here, so the clone can't change the internals of the original
            return (JeepCar) super.clone();
        } catch (CloneNotSupportedException e) {
            throw new AssertionError();
        }
    }
}

@Data
@AllArgsConstructor
public class Engine {
    private String name;

    private int speed;
}
 /**
     * 这里只会复制了第一层对象跟他的引用
     * @param args
     */
    public static void main(String[] args) {
        Engine engine = new Engine("中国", 1500);
        JeepCar t300 = new JeepCar("T300", LocalDateTime.now(), 300000.999, engine);
        JeepCar clone1 = t300.clone();
        clone1.setMode("T500");
        engine.setName("日本");
        System.out.println(t300);
        System.out.println(clone1);
    }
深拷贝的实现方式
手动拷贝(非常麻烦不推荐)
其实就是手动去处理引用的数据类型,注意的是对于不可变的也就是final修饰的类(比如String等)需要手动去处理
@Data
@AllArgsConstructor
public class JeepCar1 implements Cloneable {

    private String mode;

    private LocalDateTime createDate;

    private double price;

    private Engine1 engine;

    @Override
    public JeepCar1 clone() {
        try {
            JeepCar1 clone = (JeepCar1) super.clone();
            clone.engine = this.engine.clone();
            return clone;
        } catch (CloneNotSupportedException e) {
            throw new AssertionError();
        }
    }
}
public class Engine1 implements Cloneable {
    private String name;

    private int speed;

    @Override
    public Engine1 clone() {
        try {
            Engine1 clone = (Engine1) super.clone();
            // TODO: copy mutable state here, so the clone can't change the internals of the original
            return clone;
        } catch (CloneNotSupportedException e) {
            throw new AssertionError();
        }
    }
}
序列化拷贝
需要每个应用对象都序列化,相对来说在大数据量的时候比较简单
@Data
@AllArgsConstructor
public class JeepCar2 implements Serializable {

    private String mode;

    private LocalDateTime createDate;

    private double price;

    private Engine2 engine;

    public JeepCar2 deepCopy() throws IOException, ClassNotFoundException {
        ByteArrayOutputStream byteOut = new ByteArrayOutputStream();
        ObjectOutputStream out = new ObjectOutputStream(byteOut);
        out.writeObject(this);
        ByteArrayInputStream byteIn = new ByteArrayInputStream(byteOut.toByteArray());
        ObjectInputStream in = new ObjectInputStream(byteIn);
        return (JeepCar2) in.readObject();
    }

}

public class Engine2 implements Serializable {
    private String name;

    private int speed;
}

public class Test2 {

    public static void main(String[] args) throws IOException, ClassNotFoundException {
        Engine2 engine = new Engine2("中国", 1500);
        JeepCar2 t300 = new JeepCar2("T300", LocalDateTime.now(), 300000.999, engine);
        JeepCar2 jeepCar2 = t300.deepCopy();
        jeepCar2.setMode("T500");
        engine.setName("日本");
        System.out.println(t300);
        System.out.println(jeepCar2);
    }
}
结构型模式
6. 适配器模式(Adapter Pattern)
适配器模式是一种结构型模式,它允许一个已经存在的类的接口与另一个接口不兼容的类进行合作。适配器模式主要分成三类:类的适配器模式、对象的适配器模式、接口的适配器模式。
场景
一个很常见的场景,我们办公大多使用笔记本,这个时候很多同事都喜欢接一个显示器,看起来更大更舒服一些。
现在很多轻薄本为了减轻重量,只配备了typec接口.显示器常用的接口是heml跟dp,不适配,那么我们就需要一个扩展坞来使显示器的接口接入笔记本。
显示器(源对象) -> 扩展坞(适配器对象)-> macBook(目标接口)
public interface DisplayHdml {

    public String hdml();
}

public class DisplayHdmlImpl implements DisplayHdml {

    public String hdml() {
        return "显示器hdml接口";
    }
}

public interface MacBook {
    String typec(String use);
}
public class MacBookImpl implements MacBook {
    @Override
    public String typec(String use) {
        return "接入mac typec接口 用于" + use;
    }
}
类的适配器模式(不推荐)
不管什么扩展坞,输入端都要去接到笔记本。也就是其实要接入笔记本其实是要接入扩展坞。那么扩展坞继承macBook类获得typec接口的输入的能力,为了可以使用hdml我们再实现扩展坞接口
/**
 * 类的适配器模式
 */
public class DockingAdapterClass extends MacBookImpl implements DisplayHdml {
    @Override
    public String hdml() {
        return super.typec("显示器");
    }
}
测试
public static void main(String[] args) {
    DisplayHdml displayHdml = new DockingAdapterClass();
    System.out.println(displayHdml.hdml());

    DisplayHdml displayHdml2 = new DockingAdapterObject();
    System.out.println(displayHdml2.hdml());
}
方法的适配器
java作为单继承的语言,继承方面扩展性较差。如果类已经继承了别的类,下面这种方式扩展性更高
/**
 * 对象适配
 */
public class DockingAdapterObject implements DisplayHdml {

    MacBook macBook = new MacBookImpl();

    @Override
    public String hdml() {
        return macBook.typec("显示器");
    }
}
接口的适配器模式
有时我们写的一个接口中有多个抽象方法,当我们写该接口的实现类时,必须实现该接口的所有方法,这明显有时比较浪费,因为并不是所有的方法都是我们需要的,有时只需要某一些,此处为了解决这个问题,我们引入了接口的适配器模式,借助于一个抽象类,该抽象类实现了该接口,实现了所有的方法,而我们不和原始的接口打交道,只和该抽象类取得联系,所以我们写一个类,继承该抽象类,重写我们需要的方法就行。
public class Demo1 {
    public static void main(String[] args) {
        sub1 sub1 = new sub1();
        sub2 sub2 = new sub2();
        sub2.method2();
        sub1.method1();
    }
}

interface a {
    public void method1();
    public void method2();
}

abstract class As implements a{
    @Override
    public void method1() {}

    @Override
    public void method2() {}
}

class sub1 extends As {
    @Override
    public void method1() {
        System.out.println("方法1");
    }
}

class sub2 extends As {
    @Override
    public void method2() {
        System.out.println("方法2");
    }
}
7. 桥接模式(Bridge Pattern)
桥接模式是一种结构型模式,它将抽象部分与它的实现部分分离,使它们都可以独立地变化。
场景
咖啡店,有两种咖啡加糖或者加奶
interface CoffeeService{
   void buyCoffee();
}

//加糖咖啡
class CoffeeSugaring implements CoffeeService{
    @Override
    public void buyCoffee() {
        System.out.println("加糖");
    }
}

//加奶咖啡
class MilkSugaring implements CoffeeService{
    @Override
    public void buyCoffee() {
        System.out.println("加奶");
    }
}
现在准备加两个容量规格的咖啡,大杯和小杯,当然你可以对应加几个实现类不就得了?
interface CoffeeService{
   void buyCoffee();
}

//加糖咖啡
class MaxCoffeeSugaring implements CoffeeService{
    @Override
    public void buyCoffee() {
        System.out.println("大杯加糖");
    }
}

//加糖咖啡
class MinCoffeeSugaring implements CoffeeService{
    @Override
    public void buyCoffee() {
        System.out.println("小杯加糖");
    }
}

//加奶咖啡
class MaxCoffeeMilk implements CoffeeService{
    @Override
    public void buyCoffee() {
        System.out.println("大杯加奶");
    }
}

//加奶咖啡
class MinCoffeeMilk implements CoffeeService{
    @Override
    public void buyCoffee() {
        System.out.println("小杯加奶");
    }
}
再过几天,你们要上架超大杯很中杯子。。。。。。这时候你的实现类将是M*N所有维度的乘集,这个你需要使用设计模式,让你代码降低耦合
重新设计后代码
M*N 优化后为 M+N
public class Demo4 {

    public static void main(String[] args) {
        CoffeeAbstract coffeeAbstract = new Max();
        //加奶
        coffeeAbstract.setCoffeeService(new MilkSugaring());
        coffeeAbstract.draw();
    }
}

//购买咖啡接口
interface CoffeeService {
    void buyCoffee();
}

class CoffeeSugaring implements CoffeeService {
    @Override
    public void buyCoffee() {
        System.out.println("--加糖");
    }
}

public class CoffeeMilk implements CoffeeService {
    @Override
    public void buyCoffee() {
        System.out.println("加奶");
    }
}

//把加材料的抽象出来
abstract class CoffeeAbstract {
    protected CoffeeService coffeeService;

    public CoffeeService getCoffeeService() {
        return coffeeService;
    }

    public void setCoffeeService(CoffeeService coffeeService) {
        this.coffeeService = coffeeService;
    }
    public abstract void draw();
}


class Max extends CoffeeAbstract {
    @Override
    public void draw() {
        System.out.print("大杯");
        coffeeService.buyCoffee();
    }
}

class Min extends CoffeeAbstract {
    @Override
    public void draw() {
        System.out.print("小杯");
        coffeeService.buyCoffee();
    }
}
你想增加超大杯跟中杯只需要增加两个实现类
class Centre extends CoffeeAbstract {
    @Override
    public void draw() {
        System.out.print("中杯");
        coffeeService.buyCoffee();
    }
}

class Huge extends CoffeeAbstract {
    @Override
    public void draw() {
        System.out.print("超杯");
        coffeeService.buyCoffee();
    }
}
测试
public class Test {

    public static void main(String[] args) {
        MaxCoffee maxCoffee = new MaxCoffee();
        maxCoffee.setCoffeeService(new CoffeeSugaring());
        maxCoffee.draw();
    }
}
缺点:
桥接模式的引入会增加系统的理解与设计难度,由于聚合关联关系建立在抽象层,要求开发者针对抽象进行设计与编程。 桥接模式要求正确识别出系统中两个独立变化的维度,因此其使用范围具有一定的局限性。
8. 装饰器模式(Decorator Pattern)
装饰器模式是一种结构型模式,它允许你通过将对象包装在一个装饰器类中来扩展其行为,而不需要修改其代码。
public class Demo5 {
      public static void main(String[] args) {
        HuaMuLan huaMuLan = new HuaMuLan();
        System.out.println(huaMuLan.getAttack());
        Pifu pifu = new Pifu(huaMuLan);
        System.out.println(pifu.getAttack());
        ZhuangBei zhuangBei = new ZhuangBei(pifu);
        System.out.println(zhuangBei.getAttack());

    }
}

abstract class YingXiong{
    //加成栏
    private String incident;

    //攻击力
    private int attack;

    public abstract int getAttack();

    public abstract String getIncident();

}


//选择英雄
class HuaMuLan extends YingXiong{

    @Override
    public int getAttack() {
        return 60;
    }

    @Override
    public String getIncident() {
        return "选择花木兰\n";
    }
}

//一层装饰者 买了皮肤
class Pifu extends HuaMuLan{
    private HuaMuLan huaMuLan;

    public Pifu(HuaMuLan huaMuLan) {
        this.huaMuLan = huaMuLan;
    }

    @Override
    public int getAttack() {
        return huaMuLan.getAttack() + 10;
    }

    @Override
    public String getIncident() {
        return huaMuLan.getIncident()  + "购买皮肤水晶猎龙者\n";
    }
}

//二层装饰 买了装备
class ZhuangBei extends HuaMuLan{
    private HuaMuLan huaMuLan;

    public ZhuangBei(HuaMuLan huaMuLan) {
        this.huaMuLan = huaMuLan;
    }

    @Override
    public int getAttack() {
        return huaMuLan.getAttack() + 10;
    }

    @Override
    public String getIncident() {
        return huaMuLan.getIncident()  + "购买铁剑\n";
    }
}
9. 组合模式(Composite Pattern)
组合模式是一种结构型模式,它允许你将对象组合成树形结构来表现“整体/部分”层次结构。
示例:文件夹浏览,我们需要把不同类型的文件兼容到一个窗口
public class Demo2 {
    public static void main(String[] args) {
        Folders zwjj = new Folders("总文件夹");

        TextFile aText = new TextFile("a.txt");
        ImagerFile bImager = new ImagerFile("b.jpg");
        Folders cFolders = new Folders("C文件夹");
        zwjj.add(aText);
        zwjj.add(bImager);
        zwjj.add(cFolders);

        //向C文件夹中添加文件:c.txt、c.jpg
        TextFile cText = new TextFile("c.txt");
        ImagerFile cImage = new ImagerFile("c.jpg");
        cFolders.add(cText);
        cFolders.add(cImage);

         //遍历一级文件夹
        zwjj.getAll();
        System.out.println("-----------------------");
        //遍历C文件夹
        cFolders.getAll();
    }

}

abstract class File {
    String name;

    public File(String name) {
        this.name = name;
    }

    public abstract void getAll();

    @Override
    public String toString() {
        return "File{" +
                "name='" + name + '\'' +
                '}';
    }
}

//文件夹也是一个文件
class Folders extends File {

    List<File> files;

    public Folders(String name) {
        super(name);
        this.files = new ArrayList<>();
        ;
    }

    Boolean add(File file) {
        return files.add(file);
    }

    Boolean del(File file) {
        return files.remove(file);
    }

    @Override
    public void getAll() {
        Iterator<File> iterator = files.iterator();
        while (iterator.hasNext()) {
            System.out.println(iterator.next());
        }
    }
}

class TextFile extends File {

    public TextFile(String name) {
        super(name);
    }

    public void getAll() {
        System.out.println("这是文本文件,文件名:" + super.name);
    }
}

class ImagerFile extends File {

    public ImagerFile(String name) {
        super(name);
    }

    public void getAll() {
        System.out.println("这是图像文件,文件名:" + super.name);
    }
}
10. 外观模式(Facade Pattern)
外观模式是一种结构型模式,它提供了一个简单的接口,隐藏了一个复杂的子系统的复杂性。
public class Demo3 {
    public static void main(String[] args) {
        Service1 service1 = new Service1Impl();
        service1.all();
    }
}

interface Service1{
    void all();
}

class Service1Impl implements Service1{
    @Override
    public void all() {
        a();
        b();
        c();
    }
    void a(){
        System.out.println("方法A");
    }
    void b(){
        System.out.println("方法B");
    }
    void c(){
        System.out.println("方法C");
    }
}
11. 享元模式(Flyweight Pattern)
Java中的享元模式(Flyweight Pattern)是一种结构型设计模式,它可以在大量的相似对象之间共享尽可能多的数据,从而减少内存的使用量和提高性能。
public class Demo2 {
    public static void main(String[] args) {
        ClassFactory classFactory = new ClassFactory();
        a f1 = classFactory.getFlyweight("key1");
        a f2 = classFactory.getFlyweight("key1");
        a f3 = classFactory.getFlyweight("key2");
        System.out.println(f1);
        System.out.println(f2);
        System.out.println(f3);
    }
}

abstract class a {
    abstract void getThisclass();
}

class b extends a {
    String className;

    public b(String className) {
        this.className = className;
    }

    @Override
    void getThisclass() {
        System.out.println("当前类是" + className);
    }
}

class ClassFactory {
    static HashMap<String, a> map = new HashMap();

    a getFlyweight(String key) {
        a a = map.get(key);
        if (null == a) {
            a = new b(key);
            map.put(key, a);
        }
        return a;
    }
}
12. 代理模式(Proxy Pattern)
代理模式是一种结构型模式,它为其他对象提供一种代理以控制对这个对象的访问。
静态代理
静态代理:由程序员创建或特定工具自动生成源代码,也就是在编译时就已经将接口、被代理类、代理类等确定下来。在程序运行之前,代理类的.class文件就已经生成。
示例:房东租房,但是房东房子太多,自己处理不过来,这个时候就会选择找中介,中介负责把房子租出去
/**
 * 房东接口
 */
public interface LandlordService {

    /**
     * 出租
     * @param money 租金
     */
    void rent(Integer money);
}
/**
 * 租客实现类
 */
public class TenantImpl implements LandlordService {

    @Override
    public void rent(Integer money) {
        System.out.println("租下" + money + "元一个月的房子");
    }
}
public class IntermediaryImpl implements LandlordService {

    private LandlordService target;

    @Override
    public void rent(Integer money) {
        System.out.println("[静态代理]交中介费");
        target.rent(money);
        System.out.println("[静态代理]中介负责维修管理");
    }

    public IntermediaryImpl(LandlordService target) {
        this.target = target;
    }
}
测试
    /**
     * 通过代理类中介去租房
     * @param args
     */
    public static void main(String[] args) {
        //要租房的房客
        TenantImpl tenant = new TenantImpl();
        //通过中介去租房
        IntermediaryImpl intermediary = new IntermediaryImpl(tenant);
        intermediary.rent(2000);
    }
JDK 动态代理
- 必须有接口。
- 动态生成的代理类会实现目标对象的接口。
- 只能代理实现了接口的类。
还是租房的问题,我们再考虑一种场景,我们房子除了租给房客,还可能会有一些运营的房管或者是二房东,帮房东去打理。
这个时候我们之前的静态代理是不是不能用了?我们需要再去写一个中介给房管或者二房东等等的代理类。
概念
- 动态代理是通过运行时动态生成代理类实现的,代理类在编译期并不存在。
- 可以实现拦截目标对象的方法调用,并在方法执行前后添加自定义逻辑。
- java最常见的方式是jdk代理跟cglib代理
- JDK自带,直接依赖
java.lang.reflect,无需额外引入库。
/**
 * 房管实现类
 */
public class StewardImpl implements LandlordService {

    @Override
    public void rent(Integer money) {
        System.out.println("房管家租下" + money + "元一个月的房子");
    }
}
/**
	代理类
*/
public class RentProxy implements InvocationHandler {

    private Object target; // 代理的目标对象

    public RentProxy(Object target) {
        this.target = target;
    }

    @Override
    public Object invoke(Object proxy, Method method, Object[] args) throws Throwable {
        System.out.println("中介去代理房子");
        //如果是房管家需要支付代理费
        if (target instanceof StewardImpl) {
            Integer money = (Integer) args[0];
            int fee = (int) (money * 0.1); // 10%的管理费
            System.out.println("房管家抽取管理费:" + fee + "元");
            System.out.println("房东实际到手的房租" + (money - fee));
        }
        if (target instanceof TenantImpl) {
            System.out.println("房东实际到手的房租" + args[0]);
        }
        return method.invoke(target, args);
    }
}
public class Test {

    public static void main(String[] args) {
        // 租客的场景
        LandlordService tenant = new TenantImpl();
        LandlordService tenantProxy = (LandlordService) Proxy.newProxyInstance(
                tenant.getClass().getClassLoader(),
                tenant.getClass().getInterfaces(),
                new RentProxy(tenant)
        );
        tenantProxy.rent(3000);

        //房管家 或者二房东的场景
        LandlordService steward = new StewardImpl();
        LandlordService stewardProxy = (LandlordService) Proxy.newProxyInstance(
                steward.getClass().getClassLoader(),
                steward.getClass().getInterfaces(),
                new RentProxy(steward)
        );
        stewardProxy.rent(3000);
    }
}
CGLIB 动态代理
- 不需要接口。
- 通过继承目标类来生成代理类。
- 可以代理普通类和接口,但如果目标类是
final或目标方法是final,则无法代理(因为无法继承和覆盖)。
/**
 * 房管实现类  不需要去实现接口了
 */
public class Steward2Impl {

    public void rent(Integer money) {
        System.out.println("房管家租下" + money + "元一个月的房子");
    }
}
public class RentProxy implements MethodInterceptor {
    private Object target;

    public RentProxy(Object target) {
        this.target = target;
    }

    @Override
    public Object intercept(Object obj, Method method, Object[] args, MethodProxy proxy) throws Throwable {
        // 判断是房管家代理逻辑
        if (target instanceof Steward2Impl) {
            Integer money = (Integer) args[0];
            int fee = (int) (money * 0.1); // 10%的管理费
            System.out.println("房管家抽取管理费:" + fee + "元");
            args[0] = money - fee; // 修改租金
        }

        // 调用目标方法
        Object result = proxy.invoke(target, args);

        // 后置逻辑
        System.out.println("代理逻辑:租赁完成");
        return result;
    }

    public Object createProxy() {
        Enhancer enhancer = new Enhancer();
        enhancer.setSuperclass(target.getClass()); // 设置目标类为父类
        enhancer.setCallback(this); // 设置回调方法
        return enhancer.create(); // 创建代理对象
    }
}
public class Test {

    public static void main(String[] args) {
        Steward2Impl landlord = new Steward2Impl();

        // 创建代理对象
        RentProxy proxy = new RentProxy(landlord);
        Steward2Impl proxyLandlord = (Steward2Impl) proxy.createProxy();  // 直接创建目标类的代理,不需要接口

        // 调用代理方法
        proxyLandlord.rent(5000);
    }
}
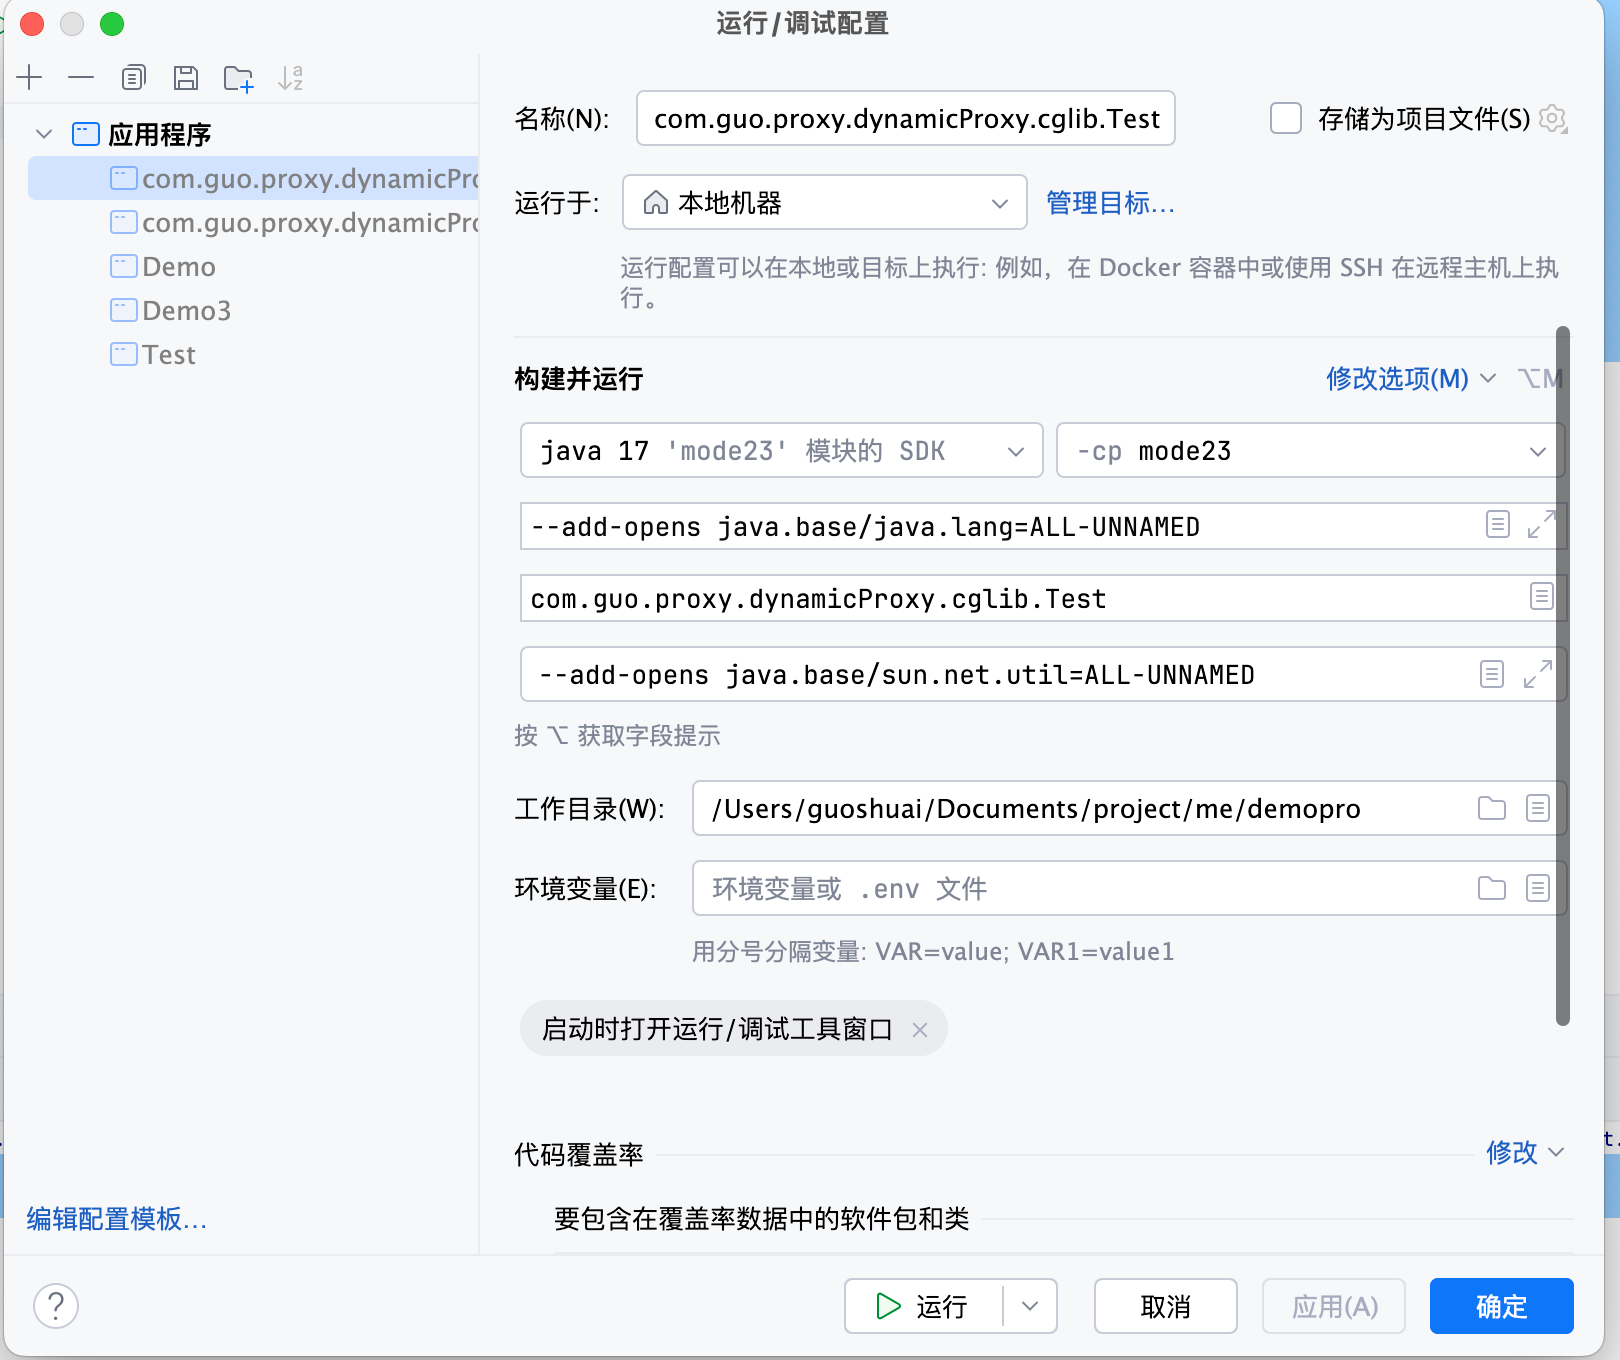
jdk17-cglib做动态代理异常
当前版本的jdk的反射相关功能被限制,导致了异常
--add-opens java.base/java.lang=ALL-UNNAMED
--add-opens java.base/sun.net.util=ALL-UNNAMED
行为型模式
13. 责任链模式(Chain of Responsibility Pattern)
责任链模式是一种行为型模式,它允许你将请求沿着处理链进行传递,直到有一个对象处理为止。
责任链模式的特点:
- 请求解耦:请求的发送者不需要指定具体的接收者,接收者动态地处理请求。
- 灵活性:可以动态地更改链中的成员,增加或删除责任对象。
- 延迟处理:请求沿链传递,直到某个对象处理该请求。
责任链模式的结构
- 抽象处理者(Handler): 定义一个处理请求的接口,包含处理请求的方法和设置下一个处理者的方法。
- 具体处理者(ConcreteHandler): 实现抽象处理者,处理请求或将其转发给下一个处理者。
- 客户端(Client): 发出请求并将其传递给链的起始处理者。
示例场景:员工的报销申请需要逐级审批,直到满足权限要求。
抽象处理者
/**
 * 抽象处理者  用于处理审批的请求
 */
public abstract class Handler {

    protected Handler nextHandler;

    public void setNextHandler(Handler nextHandler) {
        this.nextHandler = nextHandler;
    }

    public abstract void handleRequest(int amount);
}
具体处理者
// 具体处理者1:经理
public class Manager extends Handler {

    @Override
    public void handleRequest(int amount) {
        if (amount <= 1000) {
            System.out.println("经理审批通过金额: " + amount + " 元");
        } else if (nextHandler != null) {
            nextHandler.handleRequest(amount);
        }
    }
}
// 具体处理者2:总监
public class Director extends Handler {
    @Override
    public void handleRequest(int amount) {
        if (amount <= 5000) {
            System.out.println("总监审批通过金额: " + amount + " 元");
        } else if (nextHandler != null) {
            nextHandler.handleRequest(amount);
        }
    }
}
public class VicePresident extends Handler {
    @Override
    public void handleRequest(int amount) {
        if (amount <= 10000) {
            System.out.println("副总裁审批通过金额: " + amount + " 元");
        } else if (nextHandler != null) {
            nextHandler.handleRequest(amount);
        }
    }
}
客户端测试
public class Test  {
    public static void main(String[] args) {
        // 拟定三级处理人   经理处理1000内的审批 大于1000交给下一级 总监5000内.......
        Handler manager = new Manager();
        Handler director = new Director();
        Handler vicePresident = new VicePresident();

        manager.setNextHandler(director);
        director.setNextHandler(vicePresident);

        int[] requests = {500, 2000, 7000, 15000};
        for (int amount : requests) {
            System.out.println("请求金额: " + amount + " 元");
            manager.handleRequest(amount);
        }
    }
}
14. 命令模式(Command Pattern)
命令模式是一种行为型模式,它将请求封装为对象,从而允许你使用不同的请求、队列或日志来参数化客户端请求。
接口类
/**
 * 开关接口
 */
public interface Switch {

    void off();

    void on();
}
命令接收者
/**
 * 电视类 有开关的方法
 */
public class TV {

    public void open(){
        System.out.println("打开电视机");
    }

    public void close(){
        System.out.println("电视机关闭");
    }
}
/**
 * 电视机开关的实现类
 */
public class TVSwitchImpl implements Switch {

    private TV tv;

    public TVSwitchImpl(TV tv) {
        this.tv = tv;
    }

    @Override
    public void off() {
        tv.close();
    }

    @Override
    public void on() {
        tv.open();
    }
}
/**
 * 遥控器  也就是调用者
 */
public class RemoteControl {

    private Switch sw;

    public RemoteControl(Switch sw) {
        this.sw = sw;
    }

    void openTV() {
        System.out.println("接收到主人的打开请求");
        sw.on();
    }

    void closeTV() {
        System.out.println("接收到主人的打开请求");
        sw.off();
    }
}
public class Test {

    public static void main(String[] args) {
        //电视  命令接收者
        TV tv = new TV();
        // 命令的实现
        Switch sw = new TVSwitchImpl(tv);
        // 遥控器  也就是调用者
        RemoteControl remoteControl = new RemoteControl(sw);
        remoteControl.closeTV();
        remoteControl.openTV();
    }
}
15. 解释器模式(Interpreter Pattern)
解释器模式是一种行为型模式,它定义了一种语言,然后通过该语言来解释表达式。
非常复杂 👎没用且
16. 迭代器模式(Iterator Pattern)
迭代器模式是一种行为型模式,它允许你在不暴露集合底层表示的情况下遍历集合。
public class Demo {

    // 客户端
    public class IteratorPatternDemo {
        public static void main(String[] args) {
            // 创建一个集合
            Integer[] numbers = {1, 2, 3, 4, 5};
            NumberCollection collection = new NumberCollection(numbers);

            // 获取迭代器
            Iterator<Integer> iterator = collection.createIterator();

            // 遍历集合
            while (iterator.hasNext()) {
                System.out.println("当前元素: " + iterator.next());
            }
        }
    }
}

// 迭代器接口
interface Iterator<T> {
    boolean hasNext();  // 是否有下一个元素

    T next();           // 获取下一个元素
}

// 聚合接口
interface Aggregate<T> {
    Iterator<T> createIterator(); // 创建迭代器
}

// 具体聚合类:数字集合
class NumberCollection implements Aggregate<Integer> {
    private final Integer[] numbers;

    public NumberCollection(Integer[] numbers) {
        this.numbers = numbers;
    }

    @Override
    public Iterator<Integer> createIterator() {
        return new NumberIterator(numbers);
    }
}

// 具体迭代器类
class NumberIterator implements Iterator<Integer> {
    private final Integer[] numbers;
    private int position = 0;

    public NumberIterator(Integer[] numbers) {
        this.numbers = numbers;
    }

    @Override
    public boolean hasNext() {
        return position < numbers.length;
    }

    @Override
    public Integer next() {
        if (hasNext()) {
            return numbers[position++];
        }
        throw new RuntimeException("没有更多元素");
    }
}
17. 中介者模式(Mediator Pattern)
中介者模式是一种行为型模式,它允许你减少对象之间的直接耦合,通过将它们的通信委托给一个中介者对象来实现。
package com.guo.mediator;


// 客户端
public class MediatorPatternSimple {
    public static void main(String[] args) {
        Mediator controlTower = new ControlTower();

        Flight flight1 = new Flight(controlTower, "航班A");
        Flight flight2 = new Flight(controlTower, "航班B");

        flight1.requestLanding(); // 航班A 请求降落
        flight2.requestLanding(); // 航班B 请求降落(等待跑道空闲)

        flight1.freeRunway(); // 航班A 释放跑道
        flight2.requestLanding(); // 航班B 现在可以降落
    }
}


// 中介者接口
interface Mediator {
    void notify(String event, Flight flight); // 通知中介者事件
}

// 具体中介者:控制塔
class ControlTower implements Mediator {
    private boolean runwayAvailable = true; // 跑道是否可用

    @Override
    public void notify(String event, Flight flight) {
        if ("requestLanding".equals(event)) {
            if (runwayAvailable) {
                System.out.println("控制塔:允许 " + flight.getName() + " 降落");
                runwayAvailable = false;
            } else {
                System.out.println("控制塔:跑道被占用,请等待!");
            }
        } else if ("freeRunway".equals(event)) {
            System.out.println("控制塔:跑道已空闲");
            runwayAvailable = true;
        }
    }
}

// 同事类:航班
class Flight {
    private Mediator mediator;
    private String name;

    public Flight(Mediator mediator, String name) {
        this.mediator = mediator;
        this.name = name;
    }

    public String getName() {
        return name;
    }

    public void requestLanding() {
        System.out.println(name + " 请求降落");
        mediator.notify("requestLanding", this);
    }

    public void freeRunway() {
        System.out.println(name + " 已完成降落,释放跑道");
        mediator.notify("freeRunway", this);
    }
}
18. 备忘录模式(Memento Pattern)
备忘录模式是一种行为型模式,它允许你在不暴露对象实现细节的情况下保存和恢复对象的状态。
19. 观察者模式(Observer Pattern)
观察者模式是一种行为型模式,它允许你定义一种订阅机制,以便一个对象的状态发生变化时通知一组对象。
20. 状态模式(State Pattern)
状态模式是一种行为型模式,它允许你在一个对象内部状态发生变化时改变其行为。
21. 策略模式(Strategy Pattern)
策略模式是一种行为型模式,它允许你定义一系列算法,然后将它们封装在一个对象中,以便在运行时动态地选择算法。
22. 模板方法模式(Template Method Pattern)
模板方法模式是一种行为型模式,它定义了一个算法的步骤,并允许子类为一个或多个步骤提供实现。
23. 访问者模式(Visitor Pattern)
访问者模式是一种行为型模式,它允许你将操作从元素的类中分离出来,将它们封装在一个访问者对象中。